This blog includes a series of videos and references to help new users or enthusiasts better understand how to use open source and free technology tools. The quick links includes more information for accessing many of the tools covered along with other references to learn more for taking advantage of these tools.
I purchased a second hand computer recently, an old Thinkpad X280, which is perfectly fine for most all of my needs. Only problem is the screen is awful.
In an effort to slightly modify the contrast I found that there is a command in Linux under X11 (x-server is the traditional image renderer in Linux, so this may not work if your distro is using the new Wayland compositor). The command is xgamma.
Example:
~$xgamma -gamma 0.7
The above will reduce the gamma of the screen by 30% according to the X11 compositor. To make the changes stick, one can update the hidden file .profile in his/her home directory with the following:
xgamma -gamma 0.7 &> /dev/null
The &> /dev/null basically captures any would be output that results from the setting and throws it to /dev/null - basically throws it away. This is useful because otherwise there is an annoying "Okay to proceed" notice when first booting the system.
Just another find which is available if not obvious in Linux!
Here we are looking at the package managers 'apt' and 'dnf'. Both are modern and powerful tools for searching, installing, and managing the applications and packages installed in their respective Linux derivatives. Both share a lot of common commands as well, so it is very familiar to work with either.
Not mentioned in the video, but a wonderful feature of open source software, is both work in most distributions and are not 100% relegated to those specific distros that ship with each respectively. That said, the package manager is a powerful component of a distribution, and I feel it is worth trying to learn the default tooling for each distribution one really wants to spend time with.
This effort is part of a series I have rolling around in my noggin around package managers and their importance to the adoption of Linux by most people. I strongly feel that while they predate, and perhaps even inspired the concepts of App stores or Google Play used by mobile devices, not a lot of credit is really given to them. What makes package managers and the relevant repositories even more powerful than app stores is, because they run as commands, they can be scripted. Scripting allows more ease in management by sysadmins and others who need to work with a large fleet of devices.
Before App stores, Linux was always safer then Windows primarily because software was curated for the distribution of choice. Installed packages, so long as they were coming from the package manager and the associated, known-good repos, had, and continue to have, way less risk than just going to websites and downloading software to run on a Windows PC. Package managers are faster, more reliable, and safer than what many people use to install and manage software on their computing devices, making learning them very important.
Hopefully with just a few simple commands like 'apt update', 'apt upgrade', 'dnf update', 'apt install <whatever package you want in the repo>', and 'apt remove <installed package you do not want>', etc. new users can better take advantage of Linux and open source tools.
Alpine is a really nice, really light Linux distribution that is often use as the base for a lot of containerized applications. This video demonstrates how to create an appliance-like VM with a minimal Alpine install to run Minio from boot.
All of the steps aside from running the start up command using cron are in the documentation below. It is truly very simple to get working in Alpine if you just need something simple to act as an S3 object store with HTTP/HTTPS file sharing capabilities.
A couple of mistakes in the videos are there because by copying the commands from the documentation I forgot to adjust the start up and cron commands to the directory we gave it. This is why at minute 5:50 I am checking the wrong directory and the new directory is shown (miniodata vs minio). Overall it is pretty simple and perhaps the mkdir command can be skipped depending on your preference.
This is a quick post on updating and maintaining a Docker install of Nextcloud. I have had my install pretty much untouched since I first put it up about a year or two ago. The whole time it's been fine, but I heard about performance improvements in later versions and have begun the process of upgrading the service.
Here are some steps to check for.
Based on my previous restore experience, I know that going from one version of docker to the next can sometimes be version dependent. What has worked in managing the upgrades is to upgrade one version at a time.
To do this, first check what Nextcloud describes as the newest version. Enter the system as the 'admin' user, go to 'Settings' -> 'Overview'. A screen like below should show.
Nextcloud will give a few suggestions of areas to make your instance more secure or highlight any issues (this is a private instance without HTTPS, as noted, and without a lot of the Calendar and other apps), and it will display what the next version is.
That next version will be the upgrade target for the Docker instance.
In your host, you can first pull the new Docker image of Nextcloud by running:
sudo docker image pull nextcloud:<the target version from the UI>
This will save some time in the upgrade.
Next make sure everything is saved and no one is using the containers. Stop the containers with:
sudo docker stop <nextcloud container name> <nextcloud DB container name>
In my sample docker-compose reference the command would look like:
sudo docker stop nxtcloud nxtclouddb
Then modify the docker-compose.yml file with the new image specified just downloaded. For example 25.0.3 shown below.
app:
image: nextcloud:25.0.3
container_name: nxtcloud
restart: unless-stopped
ports:
.....
Once changed bring up the containers again.
sudo docker-compose up
Here I omit the -d for running in the background. This offers a terminal view of the upgrade similar to below.
Give that a few minutes, and then the Nextcloud should be upgraded to the new version.
To ensure the containers can be run in the background without an active terminal, stop the containers again, and re-run the sudo docker-compose up -d with the -d flag.
Some more information about Nextcloud is throughout the blog - just click on the Overview page or search by the Nextcloud tags on the right-hand side.
For more information about the reference docker-compose to get started with it and a MariaDB instance check out the source in GitHub.
A new find. I was watching a tech reviewer video of some Logitech stuff. I am a huge fan of Logitech especially on Linux as seems to have the best driver support for both there unifying receiver and bluetooth. In the review, they mentioned that the support software for Logitech can allow a single unifying receiver connect multiple devices. OMG!
Googling quickly about how to accomplish the same task on Linux, which Logitech doesn't officially support with their software, again the community came to the rescue. I stumbled upon Solaar!
Solaar allows for device management of Logitech stuff with a simple GUI and easy install. In PopOS - I imagine Ubuntu as well, likely Debian too - you can simply run 'apt search solaar', and then install with a 'sudo apt install solaar'.
Launch the application from the application center - in my case hit the Window key and just type 'solaar'. Like any Linux software with a GUI it should appear.
To combine the devices connected on a single receiver you can simply start a search. There will be a warning that if the devices are connected you need to unplug them for them to appear. Unplug, re-plug the 2 USB receivers.
The devices and their respective receivers should appear.
To pair a new device click on a single receiver. Click 'Pair new device'.
Unplug the mouse receiver or keyboard.
The device will start broadcasting, and the other receiver will pick it up. If the mouse is removed, there is a confirmation button that needs to be clicked. Tab to the 'Confirm' button from the keyboard and press 'Enter'.
At this point you should have 2 Logitech wireless devices on a single receiver, thus saving a USB port in Linux, or perhaps saving the need to get a new receiver in case one is lost!
Explored in previous posts and videos, MongoDB is a great way to store information without a schema. All of the information is stored in a JSON like format called BSON which essentially are documents, but similar to a SQL Database the data cannot be directly read on the host system.
I was interested in learning some more about how to backup the files. Turns out that MongoDB provides a dump tool similar to MySQL called mongodump and mongorestore.
To get started one can run the following command on their host system or container. If you used the MongoDB Docker image, the mongodump command can be run inside the container directly.
Local Run
mongodump -u=<user> -p=<password> --authenticationDatabase=admin --db=<database to download>
The part '--authenticationDatabase' is important. On the MongoDB container the users allowed to access the database are specified are in that 'admin' database on the Mongo instance, and it must be defined in the mongodump command for the connection to be successful.
Similar to mysqldump, the mongodump command can also be used from a remote host.
*Note on Fedora 36, using the RedHat/CentOS 8.0 package worked. *
Modify the previous command to the below:
Remote Run
mongodump --host=<Domain/IP> --port=<Mongo service port - default is 27017> -u=<user> -p=<password> --authenticationDatabase=admin --db=<database to download>
Assuming a connection can be made all of the database files and relevant metadata will come down to the directory where the command was run. A successful run will look similar to the below.
Once complete you will see a directory called 'dump' with the database(s) listed as directories inside.
To specify the output location on the local system (the system being used to access and backup the MongoDB instance) you may use the '-o' or '--output' flag.
Remote Run | Specify Download Location
mongodump --host=<Domain/IP>
--port=<Mongo service port> -u=<user>
-p=<password> --authenticationDatabase=admin --db=<database to
download> -o=<directory location>
Restoring data from a Mongodump
The companion utility to mongodump is mongorestore. Mongorestore works similarly to mongodump, but the user specifies the db and the back up files.
If the container was installed using the same docker-compose from the PHP and MongoDB tutorial, the port for the MongoDB Instance isn't exposed on the local system. This is good from a security standpoint. The companion web server accesses using the hostname from the private Podman / Docker network. To access the container host from the physical machine you need to use the IP address of the MongoDB container itself.
Using either Docker or Podman, run the inspect command to check to find the Network information.
sudo podman inspect <container name or ID> | grep "IPAddress"OR sudo docker inspect <container name or ID> | grep "IPAddress"
The above output is an interesting discovery I found with the relationship between Podman and Firewalld (aka firewall-cmd).
So I was tinkering with a semi-production environment that is a web server with Apache and PHP on it, and a MySQL database running as a container. This was originally just done quickly, but is becoming more and more important. Honestly, long term, I may want to just move the database to an actual VM that has all the bells and whistles - like Cron for scheduled backups, etc. I digress.
The point is I was reading an article that a lot of sites have MySQL databases without SSL. If you run your database in a container, there is a good chance it also doesn't have SSL since most Docker images do not include that out-of-the-box. I personally don't think it is a problem if the service is on a truly internal network, but I ran a Telnet check from a remote system and it responded. Holy ^$%%@#$!
Now the port shouldn't be exposed, the firewall-cmd rules for the external interface don't allow that port type. However, with further testing I was able to connect a phpmyadmin to that host from a completely remote system. Holy#$%^&*&^%$!
What happens is on RedHat / CentOS / Fedora, podman essentially knows about firewall-cmd and spins itself into the zone trusted. You get that source and everything is available from that source. This also allows the outside world to come to that port - which is NOT what we want.
Turns out though, that it is relatively straightforward to lock this down.
Backup all the databases using a mysqldump - or in this case just by using a PHPMyAdmin to export.
Then destroy the current container. Run the following:
podman stop <DB container name>
podman rm <DB container name>
Assuming the container has its /var/lib/mysql directory mounted to the host using the -v or --volume at creation likely the backups won't need to be restored. Just re-run the container creation command (example below).
The difference in the above command is that the localhost IP - 127.0.0.1 - is specified along with the port value. As such, the container is now only reachable by services or other containers running on the local system.
Now testing with a telnet command to that host with port 3306 shows unreachable, but the local web server can still interact with the database.
telnet: Unable to connect to remote host: No route to host
Most tutorials and explanations about Docker or Podman or containers in general usually cover the "-p" call as a network port. However, it can also be used to bind a specific IP:portnum which is very important to helping protect a system that is running on the Internet.
I hope this can help others keep themselves safer when using containers in production.
Recently I was forced to retire my "server" because the performance and the file system were throwing errors. This warranted an upgrade from a 14 year-old laptop to an Intel Celeron NUC. Maybe one day I'll actually get a "real" server.....
I thought I'd share the steps I took, and also point out some gotchas that I came across. Let everyone learn from my mistakes :) .
Some background:
The server essentially was a Ubuntu server instance with SMB (SAMBA) running locally on the system, and my Nextcloud with a separate MariaDB running in containers - the setup from this post. What I had done was back up all the files from the SMB share, and all the files from the mounted volumes of both the Nextcloud container and the MariaDB container.
Backup:
Important: I also took a manual mysqldump of the 'nextcloud' database in the MariaDB container. This is important.
Enter the MariaDB container by running: sudo docker exec -it nxtclouddb bash
Enter the database password and the file will be verified. I had a volume mounted to the /var/lib/mysql so the data for the MariaDB database was mapped to a directory in the host. Copying the backup file (nextclouddumpDATE.sql) to the /var/lib/mysql directory in the container allows the file to be accessible on the host so it can be copied to a separate backup.
Back up complete and verified.
Migration:
At this time we can look at the reinstall. Since it was a huge jump in architecture I couldn't just pop in the hard drive from the old laptop to the new computer - needed to reinstall. Went with Ubuntu Server 20.04, ran updates, setup the firewall, installed SMB, set that up and verified the SSH. At this point I could add the external hard drives with the backups.
Ubuntu Server is nice vs Ubuntu Desktop in that it doesn't auto-mount USB drives in a /media/<user name> directory. This is a feature in my opinion because with the server image the admin is in control.
Update the /etc/fstab with drive labels (example):
LABEL=FourTBbackup /media2 ext4 defaults 0 0
sudo mount -a will bring mount the partition(s).
Here we can start copying data back. For the SMB share I have the share mounted to another external drive, so no data copying needed on that. The nextcloud instance was running off the main drive and that needed to be copied over.
Once complete, I tried to bring up the Nextcloud containers. This was a bit reckless in a way, but given all the data was backed up, it wasn't too bad. It was here I needed to dive down a few rabbit holes.
Troubleshooting:
As soon as I visited the Nextcloud site, I was greeted by an "Internal Server Error" message. At the time I assumed the database was corrupt because I just ran off the restored database files - I didn't first import the database from backup like a good boy. This was not the problem.
Turns out there were 3 problems:
The new install warranted an IP change - need to update the Nextcloud config.php file allowed domains
Permissions of the restored files and directories all need to be set as chown www-data:www-data - I believe this was the main reason for the 'Internal Server Error'
The Docker image pulled a new version of Nextcloud and my version couldn't be migrated to the new version. You can check that in the config/config.php file.
With Nextcloud in Docker, even if you mount a volume from the host system, the image will add anything missing in the web server volume that it needs. In fact, all that was really needed where the /config, /data, /apps, /3rdparty directories. The /data directory is actually where all the files and other info is saved for the various users. All other files and directories can be removed from the volume mount on the host. More info here in this post.
So what was needed was to specify the older version of Nextcloud in my docker-compose.yml file (image: nextcloud:22.2), only copy the /config, /data, /apps, /3rdparty directories to the mapped volume, and then rebuild the containers.
sudo docker-compose up -d
At that point, there was still a minor update on Nextcloud (from 22.2.02 to 22.2.10) but that was fine.
Nextcloud was restored and everything was well.
I will say Docker is pretty handy for this - one can just docker-compose up and down to rebuild containers fast and test different things.
With Nextcloud, the platform is built fairly robust, but the mapping of files to the database and all the complex apps can make backup and restore tricky - particularly when migrating to a new system. Having all the database files, an actual DB dump, and all the Nextcloud files available is the #1 most important step. Back ups = options.
I'm also pretty glad I made the move when I did - when I had a poor performing, but still usable system so I could verify the backups and be careful.
Hope this is helpful. I definitely learn more and more about Nextcloud every time I need to rebuild it, and hopefully this post can save others some valuable time.
This is another important community information piece designed to help save other people hours of time doing Google searches.
So on my current laptop, I have 2 partitions - the root directory / where all the operating system lives, and the /home directory. The /home directory is encrypted using the LUKS algorithm that most Linux distros make available during install. However, I needed to increase the size of the root directory /. This is tedious but doable.
Steps:
Back up the whole /home directory. In Linux there are many hidden files and settings that need to get backed up so I recommend using the command line to ensure you get it all.
cp /home/* <back up destination>
Once that completes, shutdown the computer and boot into a Live instance. This is typically created on the USB drive that is most commonly used to install Linux on a bare-metal system these days.
Once in the Live instance booted in the USB you need to delete the existing /home directory in order to increase the size of the root directory /. This is because partitions in Linux and most operating systems are mapped sequentially on the logical volume (in this case a since SSD, but could be a RAID group, a LUN, mapped storage, etc.). Since the root directory needed to increase in size, I needed to move the /home directory out of the way.
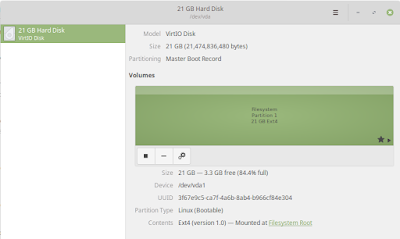
I used the Gparted tool to do this. It can handle all of the deletion and resizing of the partitions. Alternatively, for this the Gnome Disks utility (image at top of article) also can handle the fairly basic task as well.
In Gparted select the correct drive in the upper right-hand corner, then delete the already backed up /home directory partition.
Click on the root directory / partition, and click 'Resize / Move'. I added another 30000 MiB or around 30 GB to the partition.
Click on the remaining space in create a new partition using all the remaining space. This will become the new /home directory.
Open the Disks utility which should be in most mainstream distros - Ubuntu, Fedora, Red Hat, CentOS, Linux Mint, etc.
The Disks utility has a nice feature to allow for the LUKS encryption which I wanted, so I re-formatted the newly claimed space. Probably would have been faster to do all of this in the Disks utility, but I felt more comfortable with Gparted for the resizing.
Disks also has an option to set the mount point of the partition, which we need to do. I personally edited the /etc/fstab table which is where Linux knows to mount what where at start up, but using the Disks utility also can control this. Changes to the mount options made in the Disks utility will also show up in the /etc/fstab table.
Once that is done, it should be possible to mount the /home partition on the Linux Live instance running from the bootable USB and copy over all of the data from the backed up /home directory. Maybe it's saved somewhere else on a computer, or in an external hard drive, but again I recommend to run the reverse of the cp command to ensure EVERYTHING is placed back on the new partition.
cp <back up destination>/* /home
Once all of that is done there is one more step that I missed. It won't cause data loss, but I found the computer kept taking a long time to boot. In Linux if the boot sequence is taking a long time, you can press 'Esc' to see what's happening - another reason I really like Linux. Something like this:
Now that was weird to me because I had changed the mount point already, and in the /etc/fstab I had removed the old mount point to /home. I somehow had thought this might happen - a moment of forethought that usually doesn't happen for me. I thought I had prepared for this.
Turns out that not only does /etc/fstab need to be adjusted, if the partition was encrypted from the beginning, there is an additional encryption setting that also tracks the devices that need decryption on boot. The file is /etc/crypttab
Comment out the old partition that no longer exists and all is grand!
So in short the steps are:
Backup the whole /home directory
Boot into a Live environment
Delete the BACKED UP /home directory partition
Resize the root directory '/' partition
Build a new partition for /home
Ensure the mount point is set, and double check /etc/fstab to ensure the old partition isn't listed. (Also ensure that you check the /etc/fstab of the SSD, not the USB environment.)
If the old partition was encrypted, comment or delete the line referring to the old partition in /etc/crypttab
Re-copy all the data from the backup to the new /home partition
Reboot into the OS on the SSD - everything should still work just as before but the partition sizes will have changed
I hope this can help as a reference for anyone who needs to adjust the partitions around on a Linux device. Linux is really flexible for these tasks, but always, always, always have a separate back up, if not two.